
Avoid Steam Autoclave Installation Nightmares with a Quick “Site Survey”
By: Priorclave North America
Category: Lab Design

As a matter of course, Priorclave sales director Lee Oakley likes to be certain that a site survey is completed as early as possible—well before a buyer has placed an order for their steam autoclave. Ideally, his site surveys are an actual in-person visit. This gives the autoclave technician or installer an opportunity to walk through the lab space and related facilities in order to ensure the installation and commissioning can go smoothly.
“Major issues can happen,” Lee explains, “if that step gets skipped. In fact, we just recently finished sorting out quite a mess around a power door steam autoclave purchased by a research university.” In this case, due to a series of factors, the sale had moved without the benefit of a site survey. Realizing the oversight, a Priorclave technician went out to perform the site survey and “tick off that box.”
Once on site, they discovered a disaster waiting to happen:
In order to deliver and install the autoclave this university had purchased, they would need to build a scaffolding, hire a crane, and block off the road.
All of that is extremely disruptive—and expensive. And that was just to get the autoclave into the lab. “Once you got in,” Lee discovered, “the autoclave as quoted wouldn’t even fit in the lab.”
Making Sure Their “Dream Autoclave” Isn’t a Pipe Dream
When it comes to research, education, and industrial lab autoclaves, there are no one-size-fits all solutions. Every autoclave needs to meet not just workflow and application demands, but also mesh with the facility itself. That’s why Priorclave always begins the steam autoclave specification process with a conversation.
Once they’ve established what sort of work the end-user is doing, what size and types of loads they need to run, and how many cycles per day are the norm, the Priorclave team begins to “rough out” the autoclave spec.
“At that point, you want to do the site survey as soon as possible,” Lee explains. “To see what issues there are, if any, that you need to account for.”
While it’s ideal to have the autoclave installation team perform the site survey, that’s not always possible. At the very least, the lab manager or administrator will want to enlist the help of their facility or maintenance manager in performing their own site survey prior to ordering a new steam autoclave.
A good site survey is a four-part process. It begins in the lab—at the precise location where you hope to put your autoclave—and works its way out to the street.
Part #1: Look at the Lab
Consider where you plan to put this autoclave in your lab. The lab space set aside for the autoclave needs to be able to accommodate the autoclave footprint (usually available on the manufacturer website) plus leave space for door-swing (in the case of front-loaders) or overhead clearance (for top-loaders and power door models). It also needs clearance around the autoclave for routine maintenance and occasional repairs. For a Priorclave, that’s roughly a foot of clearance behind the sterilizer and one-and-a-half to two feet of clearance to either side for hookups and servicing.
But the lab survey doesn’t stop at just making sure there’s enough space. You need an appropriate electrical supply, sanitary sewer line (steam autoclave effluent is just shy of boiling and not all sewer pipes can handle that), and possibly steam hookup (if you’ve chosen to use house steam). If your autoclave generates its own steam, you need to be sure there is a water feed available. You’ll also want to test your water hardness. Although hard water is hard on your autoclave, it’s also easy to address, provided you have room in your lab to add a water softener or filtration system.
Once you’re done in the lab, it’s time to start working your way toward the loading docks.
Part #2: Look at the Building
Now, consider how you get your new autoclave from outside your building to your lab. Are all of the doors wide enough to accommodate the autoclave you’re considering (again, based on the dimensions on the manufacturer data sheet)? Are the halls wide enough? What about tight turns? Will the autoclave fit through all of these?
If you’re upstairs or downstairs, do you have an elevator that can accommodate the autoclave? If not, can you get it up or down the stairs with the assistance of a stair-climbing dolly—and can your dolly bear the weight of the autoclave? For example, Priorclave’s popular 150L front-loader weighs between 400 and 500 lbs. Many affordable stair-climbing dollies are only rated to lift around 400 pounds.
Even if you have narrow stairs and no elevator, that doesn’t mean you can’t have your autoclave. “There are times we’ve built a steam autoclave, a front-loader, in a top section and a bottom section,” Lee recalls. “Then we can carry each half up manually, and basically construct it in the lab and put it all in a single case. In the end it looks and operates as though it shipped from our warehouse in a single piece, but it’s actually two pieces. And then, of course, it can later be dismantled and carried out, if need dictates.”
Part #3: Look at Delivery
Once you’ve determined the limitations on getting the autoclave up to the lab, it’s time to consider how it gets from the delivery truck into the building.
Can the delivery vehicle get to the loading dock? If not, how close can you get to the building? Are there any steps, ramps, gates, curbs, doorways, or security barriers that might cause problems?
“We had one in Cambridge,” Lee recalls, “where we could get the vehicle there no problem at all. But we needed to get a crane to get it from the truck to the building because there was a ramp to the doors that was too narrow and the autoclave was too heavy.”
Part #4: Look at any Special Considerations
Special considerations are any issues that aren’t strictly structural/mechanical, but nonetheless have the capacity to cause deal-breaking complications.
For example, are there certain days or times that delivery or installation cannot happen? Or is there work that cannot be interrupted? Depending on local building codes and permit requirements, it might take several days to fully install and commission a new steam autoclave. For example, you may need to have a municipal building inspector examine new wiring or plumbing before the walls are closed up. If you are in the midst of work that cannot be interrupted, you’ll need to be sure that you have enough space to keep your old autoclave operational while the new one is being installed.
Special considerations can be especially hard to spot if you are a regular building user—and very easy to see if you’re the one who will be installing an autoclave. “We did one in Westminster,” Lee notes, “where they had lovely parquet flooring, all bright and shiny. So we had to cover the floors to wheel the autoclave in without damaging the floors. Perfectly obvious to us, but the sort of thing that someone who walks on that floor every day might not even think twice about, until that floor got damaged bringing in a heavy new piece of lab equipment.”
Special Considerations for BSL-3/CAT III Labs
BSL-3/CAT III biocontainment/”clean-room” labs need a little extra consideration. This is both because of heightened concerns about contamination, and because they tend to be more complex spaces in general.
A frequent sticking point in BSL-3 containment labs is the “airlock” vestibule. Any BSL-3 lab needs two sets of interlocking doors so that any filtered air cannot pass out of the containment area into the building at large.
How big is that vestibule? You’d be surprised how often someone measures those doors, but doesn’t think to measure the space between them.
“I’ve gone into plenty of CAT III rooms [i.e., BSL-3 labs] where they can’t have a front-loader, only a top-loader. It’s not because the lab doesn’t have the room, but because the space in the ‘airlock’ can’t accommodate the footprint of a front-loader.”
Most BSL-3 labs favor a double-ended “pass-thru” autoclave—which likewise warrants a little extra time during your site survey.
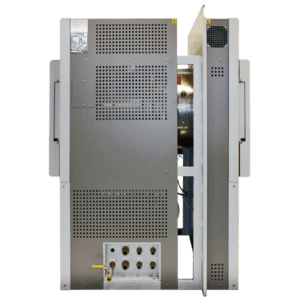
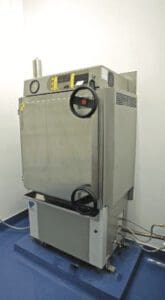
A pass thru-steam autoclave, side view
Special Considerations for Pass-Through Steam Autoclaves
“It’s even more challenging with a pass-through autoclave,” Lee notes. It has all the same concerns as any other autoclave. (E.g., making sure that you have proper utility hookups, water pressure, sewer access, you’re able to get it into the building and into the lab, etc.) But this comes with the added wrinkle of needing to install it through a wall in such a way that it can be used and serviced.
“On the pass-through, you have the side that’s in the containment lab, and the ‘service side’ [outside the cleanroom]. You don’t want the service side to be in the containment lab because, otherwise, you need to close the lab down and decontaminate it before an engineer can go in. So the service side is always going to be where you can get access”—i.e., projecting outside of the containment area (as shown below).
As you can see, this takes up a fair bit of floorspace. And, as usual, you need access to both sides of the autoclave (electric and water have to be on opposite sides of the unit, for safety)—plus clearance for the door.
“It’s a lot of details you want to have right,” Lee says. “I went to one in London where they wanted [a] 150L [autoclave]. Once you considered all the factors, there was only one spot on the wall where you could put it, and there was a load-bearing column that would be in the way of the autoclave door. No way around it. In the end, we determined it just wasn’t possible, because of their building configuration, to have a pass-thru autoclave. Instead, we installed a separate autoclave in their CAT III lab—which can be done, but isn’t convenient for servicing, as the technician has to fully gown-up in order to service it.”