
Autoclave Installation: Everything You Need to Know
By: Priorclave North America
Categories: Lab Design Lab Practices
Every autoclave has slightly different installation requirements and preferences. Making the right decisions now will help ensure a long service life, easy maintenance, and minimal building wear and tear.
Arguably, the most important installation step is the one that comes before you even decide what model to purchase. Otherwise, you can wind up with a mess like this:
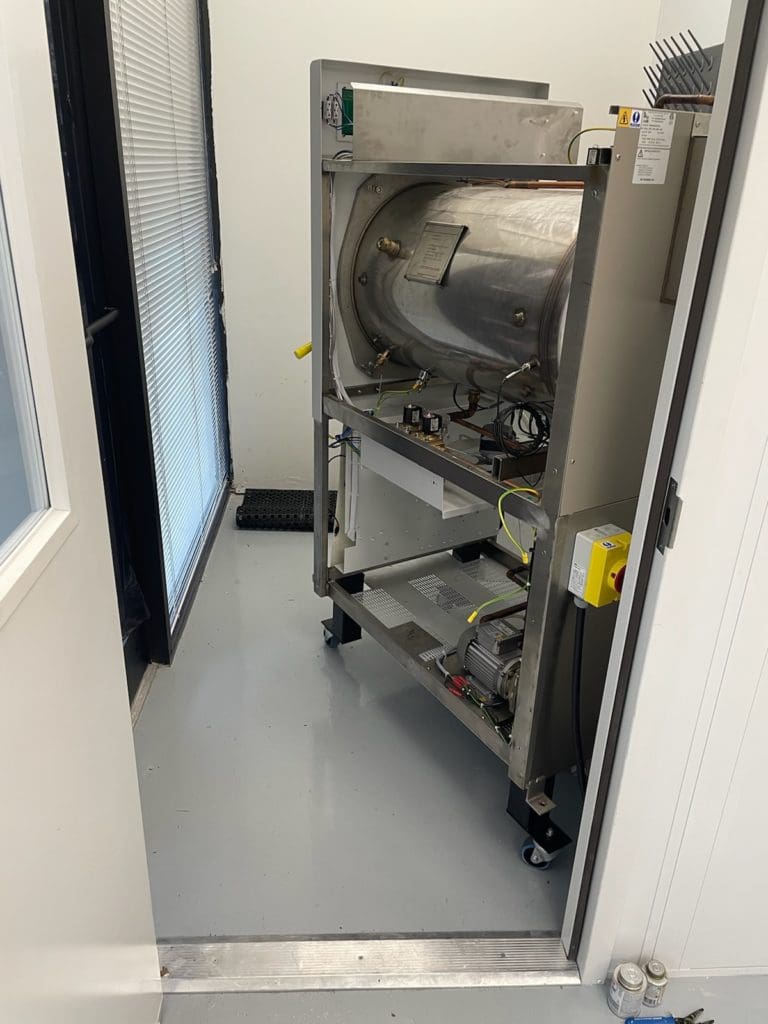
This isn’t a candid photo of an autoclave mid-installation. This was the final installed position, just prior to removing the casters and putting the panels back on. The customer insisted they had measured the designated lab space carefully. They were positive their new 150L autoclave would fit perfectly. Nonetheless, this was the only way that it could be usably positioned. To use this autoclave, techs and researchers are stuck squeezing through a gap of about 18 inches between the autoclave and the wall.
The lesson here: Every good installation starts with an honest and accurate site survey, followed by thoughtful consideration of autoclave placement.
Start With a Plan: Pre-Purchase Site Survey and Positioning Requirements
A good site survey is a four-part process that requires a few simple tools: a tape measure, a pair of honest open eyes, and some way to take notes It begins in the lab—at the precise location where you hope to put your autoclave—and works its way out to the street. For more details, check out this blog we wrote in 2022 with Priorclave’s UK sales director, Lee Oakley: “Avoid Steam Autoclave Installation Nightmares with a Quick Site Survey.”
Once your survey is complete and you know that the autoclave you plan to purchase can indeed fit through your doorways and reach your lab, it’s time to decide on precise placement.
Autoclaves are hot. Like a dishwasher, they can release a decent amount of steam when opened for unloading. Therefore, you don’t want to put them somewhere with poor ventilation. Recently retired Priorclave Managing Director Tony Collins once noted that too many labs assume it’s fine to “just stick the autoclave in a little room off the side, and it makes it like a Turkish bath in there.” This can cause headaches down the road if you install your autoclave where these thermal realities will strain other equipment, such as ultra low temperature (ULT) freezers, or damage sensitive equipment or supplies.
Priorclave autoclaves need a minimum clearance of 18” on either side (for maintenance) and 12” clearance in the rear (to accommodate the service connections shown in the photo below). Priorclaves ship with casters to ease initial positioning and installation, but those will be removed during the final step, when the autoclave is leveled on its integrated legs to ensure proper drainage. If the autoclave has to be moved each time you want to access the panels or pipework, it will need to be re-leveled once you’re finished.
Autoclave Plumbing Requirements
Most Priorclaves larger than 100 L will need to connect to both a drain service and water supply.

This is an example of a Priorclave’s plumbing connections. Different models with different options will often have slight differences in the precise number and placement of these connections, but every Priorclave will have at least one of each of the following: Water Inlet, Vent, Safety Blowdown, and Manual Drain
Drain Service
Each Priorclave autoclave has several drain outlets on the back of the unit, as shown above. At the very least, yours will have a VENT and MANUAL DRAIN (it might also have one or more OVERFLOW connections for drip trays or internal reservoirs). These connections all need to go to a drain service of some sort.
The VENT outlet allows pressurized steam to leave the chamber. Given that most North American drain systems won’t tolerate the extreme heat of this steam, most Priorclaves come fitted with an internal drain condenser to cool the steam prior to it leaving the VENT outlet.
Typically, all outlets are run to the same drain manifold (like the one shown below), which has ½” NPT fittings. That manifold in turn flows to the drain.
Autoclaves 100L and larger need a 12” x 12” x 8” floor drain (often called a “floor sink”), as shown below. This needs to be near the wall, and behind (not beneath) the autoclave (hence the rear clearance requirements mentioned above). The drain should be lower than all of the autoclave outlets and within 6’ of the rear of the autoclave.
Benchtop autoclaves can get by with a 1⅜” (35mm) stand pipe drain, but that should also should be lower than the autoclave outlet and within 6’ of rear of unit. A floor sink is also acceptable. In either case, if the autoclave does not have a drain condenser installed, then the drain must be part of a sewer line system capable of withstanding effluent at 140°F (60°C).

Water Supply
Priorclave autoclaves need a softened water supply. That supply should have a minimum flow rate of 36 PSI. That’s basically the minimum pressure for municipal water supplies in North American cities. The supply should be installed with a service cut-off within 6’ of the rear of the autoclave and should terminate in a ½” NPT fitting, which will connect to the WATER INLET shown above.
In most cases, a Priorclave sold in North America will include an integrated drain condenser. The condenser will have its own inlet. This can be connected to a separate non-softened water supply, or can be plumbed to the same water supply as the primary WATER INLET using a y-split.
Safety Blowdown
The SAFETY BLOWDOWN is a fail-safe measure. It will keep you safe and prevent damage to the autoclave in the case of an over-pressure failure. In the worst case scenario, an over-pressure can cause a rupture in the chamber and lead to an explosion. If the chamber exceeds the maximum safe pressure it’s rated to handle, the mechanical safety valve pops open, expelling steam into the room through the SAFETY BLOWDOWN outlet. This makes it abundantly clear to everyone that there is an emergency situation in need of immediate attention. It also prevents the autoclave from being used further until it is inspected and repaired.
The SAFETY BLOWDOWN should never be connected to any sort of vent or drain. It is permissible to extend the SAFETY BLOWDOWN outlet to within 3” (75mm) of the floor, provided you do so with a pipe of the same diameter.
Autoclave Electrical Requirements
Priorclaves need a 220–230 volt, 60 Hz, grounded, three-phase power supply rated at 30 amps/phase. This receptacle should be within 3 feet of the rear of the autoclave. In most buildings in North America, that will mean installing a buck-boost transformer. This will bring the standard 208 V up to 230 V. You’ll want to make sure this connection has a waterproof single receptacle matching the plug supplied with your autoclave.
Find the Answers You Need With Priorclave
At Priorclave, our goal is always to match every lab with the autoclave that will best serve their needs, facilitate installation with minimal hassle, and help keep everything running smoothly far into the future.
Have questions or want to discuss your lab’s autoclave needs? We’re pleased to offer comprehensive documentation to walk you through the installation process. Or you can just give us a call and talk it through. Our team of experts is happy to help you determine the right autoclave for your lab.